How Do You Make Perfect Classic Homemade White Bread?
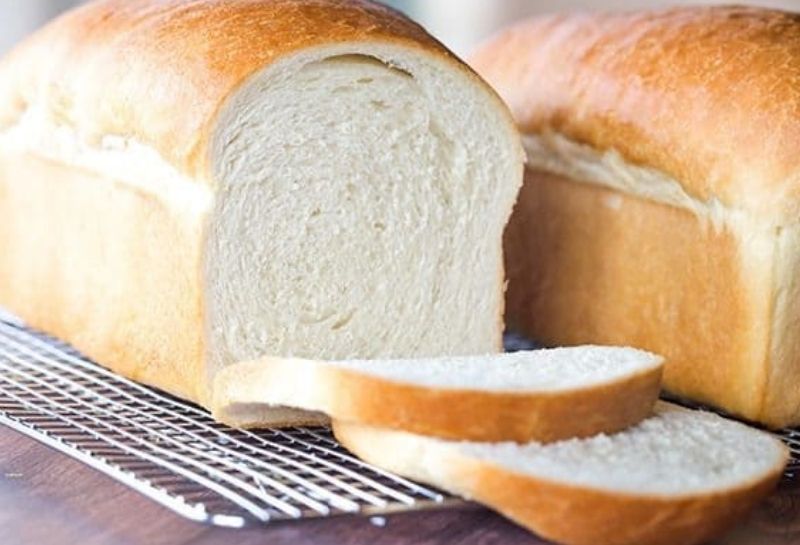
There’s something magical about pulling a golden loaf of homemade white bread from the oven. That crisp crust giving way to a cloud-soft interior, the heavenly aroma filling your kitchen – it’s comfort food at its finest. But if you’ve ever ended up with dense, doughy bricks instead of light, airy slices, you know bread-making can be tricky. Don’t worry – we’re about to break down everything you need to know to bake perfect classic white bread that would make your grandmother proud. From choosing the right flour to mastering the kneading technique, let’s get your hands floury and your kitchen smelling like a bakery.
The Essential Ingredients for Classic White Bread
Great bread starts with simple, quality ingredients. Here’s what you’ll need:
- Bread flour: Higher protein content
- Active dry yeast: Fresh is crucial
- Warm water: About 110°F
- Granulated sugar: Feeds the yeast
- Salt: Controls yeast growth
- Butter/milk: For richness
Pro tip: Check your yeast’s expiration date! Dead yeast means flat bread. And while all-purpose flour works in a pinch, bread flour’s extra gluten gives you that perfect chew.
Step-by-Step Bread Making Process
Now, let’s walk through the bread-making journey from sticky dough to glorious loaf.
1. Activating the Yeast (The Foundation)
This first step determines everything:
- Dissolve sugar in warm water
- Sprinkle yeast on top
- Wait 5-10 minutes until foamy
- No foam? Start over
Your water should be warm like bathwater – too hot kills yeast, too cold won’t activate it. This “proofing” step is your first quality check.
2. Mixing and Kneading the Dough
Now comes the arm workout:
- Combine dry ingredients first
- Add yeast mixture gradually
- Knead 8-10 minutes by hand
- Windowpane test: Check elasticity
Kneading develops gluten, which gives bread its structure. Don’t skimp on this step! The dough should become smooth and slightly tacky but not sticky.
3. First Rise (Bulk Fermentation)
Let the magic happen:
- Oil bowl lightly
- Cover with damp towel
- Let rise 1-2 hours
- Double in size is perfect
Find a warm, draft-free spot. Near (not on) the oven works well. This slow fermentation develops flavor – patience pays off here.
4. Shaping and Second Rise
Time to form your loaf:
- Punch down dough gently
- Shape into loaf
- Place in greased pan
- Rise again 30-60 min
Resist the urge to over-handle the dough. A smooth, tight surface creates that perfect domed top.
5. Baking to Golden Perfection
The grand finale:
- Preheat oven 375°F
- Bake 30-35 minutes
- Internal temp 190°F
- Cool completely before slicing
That last one’s tough – we know! But cutting too soon releases steam and makes bread gummy. For extra shine, brush with melted butter after baking.
Common White Bread Problems (And How to Fix Them)
Even experienced bakers run into issues. Here’s your troubleshooting guide:
- Dense bread: Under-kneaded
- Too heavy: Over-proofed
- Pale crust: Needs egg wash
- Crumbly texture: Too much flour
- Yeasty taste: Rose too long
Take notes each time you bake – adjusting water by tablespoons or shortening rise time by 15 minutes can make all the difference.
Equipment That Makes Bread Baking Easier
While you can make bread with basic kitchen tools, these upgrades help:
- Stand mixer: For easy kneading
- Dough scraper: Handy cleanup
- Digital scale: Precise measuring
- Thermometer: Perfect doneness
- Bread lame: Professional scoring
Start simple, then invest in tools as you bake more. That stand mixer with dough hook? Worth every penny when you’re making weekly loaves.
Creative Variations on Classic White Bread
Once you’ve mastered the basic recipe, try these tasty twists:
- Honey wheat: Swap some white flour
- Herb bread: Add rosemary/thyme
- Cheese swirl: Layer in cheddar
- Garlic knots: Shape differently
- Brioche style: Extra eggs/butter
Experiment with add-ins after the first rise. Sun-dried tomatoes, olives, or cinnamon raisins can transform your basic loaf into something special.
Storing and Freezing Homemade Bread
Keep your bread fresh with these tips:
- Room temp: 2-3 days max
- Paper bag: Better than plastic
- Freeze slices: Toast straight from freezer
- Revive stale bread: Quick oven heat
For longer storage, freeze cooled loaves whole in foil, then thaw at room temperature. A quick 5-minute reheat in the oven brings back that fresh-baked feel.
Why Homemade Beats Store-Bought Every Time
Beyond the unbeatable aroma and taste, homemade bread offers:
- No preservatives
- Custom textures
- Cost effective
- Therapeutic process
- Impressive results
Once you taste warm bread fresh from your oven, those plastic-wrapped supermarket loaves just won’t compare. And think of the bragging rights!


